Thursday, May 30, 2013
Jim Sikes Corvettes I Can Handle Now What Is Neutral All About Again

The picture above is of San Diego "runaway Prius" driver Jim Sikes talking to a TV news reporter Monday afternoon, following a news conference about his alleged unintended acceleration incident.
Thats him with his back to you....wearing a "Corvette Owners Club of San Diego" jacket.
Now let me get this straight: A Corvette owner...who panics about doing 80 miles an hour on the interstate and later tells a magazine he didnt put the car in neutral because he "thought it would stop too suddenly"?
To borrow a phrase from at least two other automotive blogs: Whiskey Tango Foxtrot?
IF Sikes belongs to the Corvette Owners Club of San Diego (Im waiting on a response to my request for confirmation by the club), hes in for some serious ribbing at the next meeting.
Even better, his real estate website shows a company car...a PT Cruiser.
Meantime, people claiming to know Jim Sikes are starting to bubble up in the most interesting places and leaving comments. Like here. And definitely here.
And before you think that Prius drivers are all car-haters who cant drive, the Prius Chat boards are really worth a read. There are two threads on Mr. Sikes wild ride, here and here.

Tuesday, May 28, 2013
Painting car interior with their own hands
Since the coating of a car gets older and eventually ceases to perform its protective functions there is a need to complete painting. Of course painting interior exacting work at home, but workable. The fact that the auto body shop after washing was dried in a chamber at a temperature of 90 degrees. In a domestic environment, you can use industrial dryers. The very process of painting takes up only ten percent of the time, and the rest of the time uhoditna training vehicle. In order to prepare the car for painting we need: abrasive paper and mount to it, two part putty, primer, solvent, white spirit, cotton rags, paint gun, "Sadolin". The first step is to wash and dry the car, after performing the disassembly of the body, in part, removing decorative and rubber parts. Before you remove the old paint and shoot it can be both mechanical and chemical methods to uncover pockets of corrosion, and remove the rust before the advent of pure iron, then apply primer. After removing the old coating must, with the help of white spirit, to degrease the body. At the same importance is the fact that, after degreasing should not be left any lint or by hand, nor of the tissue. Then you can begin to paint the car. The first plot the so-called Developing a layer, it is four parts paint and one part "Sadolin". This is done to detect surface defects after the fillers. Paint is applied as follows: first box, and then door and window openings and the main surface - horizontal movements, and always on top vniz.Takzhe should apply two coats of paint. After painting the car can be dried in the sun to dry must be within two or three days in the garage. But this is not vse.Pochti all machines there black or gray plastic, which quickly become boring. Exit est.Nado krasit.Konechno can buy expensive paint Folia Tec, but it is not an option, why throw away a lot of money. You just need to go to the nearest car market and choose the paint. On the interior of any car it takes an average of about two bottles of paint, we paint the instrument panel, door handles and center console, about three-cylinder platifikatora and varnish. The process is as follows. After drawing two or three layers of plasticizer giving it to dry. When the plasticizer is dry apply two coats of paint, with an interval between the deposition of each layer is about fifteen minutes. And the final step in applying the varnish. Where the surface are in contact with the fingers should be applied more polish. In that case if you correctly paint your room, paint will stick around for four years. The main thing with painting is not to overdo it and do not apply paint more than necessary. Now after you've made a painting of your car, you just allow it to dry and to calculate how much you saved on it.
Sunday, May 26, 2013
Repair parts differ
Repair parts main transmission and differential, requires experience and skill of specialists. The main defects in the repair may be wearing spikes crossing the differential gear teeth, holes in the box differ, necks under the bearings on the shafts, cones and keyways or splines shafts end surfaces poluosevyh gears and satellites, seals, bearings landing sites. Identification and elimination of various defects can be made after partial or complete disassembly of the main transmission and differential. Current maintenance is usually performed when replacing damaged seals and worn bearings. Gear should be replaced with a large wear or breakage of teeth. Getting the correct position of engagement of teeth can be achieved by simultaneously replacing the conjugate gear. Check proper engagement of gears of the main gear is made on paint. With a view to the work surface adjacent teeth of the driven gear can apply a thin layer of paint that is diluted in oil. Then carry through the drive shaft is in one or the other the opposite direction. At the same time on the shaded teeth of driven gear and the places of contact with the teeth of pinion gear begins to appear friendly sites, or the contact patch. Location of the contact with the wide part of the tooth indicates that it is necessary to move up driven gear to the lead. And if the side clearance between the teeth to be very small, it is necessary to move the pinion gear. In the case of the location of the contact patch in a narrow part of the tooth to move the driven gear from the master. If the repair seen a big backlash, then we can move up pinion gear. When marking the contact spot at the tip of the tooth must move up to a pinion gear driven. Small size of the backlash can be increased by pushing the driven gear. If the contact spot marked at the base of the tooth, then you need to move the pinion gear from the driven, but with too large size of the gap can move up driven gear. Proper engagement of gear teeth displays the default location of the contact spot, exactly in the middle edge of the tooth along the entire length. Eliminating axial clearance in the bearings in the repair of the main transmission and differential, and adjustable engagement of gears can be done in different ways. Axial gap bearings pinion shaft can be adjusted by changing the number of pads. The total thickness of the strips are usually chosen so as to prevent axial movement of the shaft, and its turn-by-flange could be a little effort. Adjusting the axial clearance bearing boxes differ, the intermediate shaft can also be made with gaskets. When carrying out adjustment of engagement of gears driven bevel gear is moved in relation to the rearrangement of the leading pads and leads with respect to the slave can be adjusted by changing the number of shims under the bearing frame shaft leading bevel gear. Valid values ??backlash, conical teeth located between the pair of the new main gear should not exceed 0,24-0,48 mm.
Friday, May 24, 2013
Painting plastic car with his hands
In the car the most important role played by its specifications. Nevertheless, many motorists want their vehicle looked excellent and the outside, because at present the style and well-groomed appearance of the machine is as important as the inner content. There are many companies that deal with the tuning of the car, that is, equip him all sorts of designs that adorn cars. This may be aerodynamic body kits, bumpers and door sills. However, such "decorations" may eventually wear out, there are scratches and chips. Improve the look of the car can not only expensive salons, but also with their own hands by resorting to the help of a number of tools, and spent a little time. So, how can you paint the car yourself? First you need to prepare the item you intend to paint. Firstly, it should be removed from irregularities with a special putty, and then cover the soil for plastic. But above all, use White Spirit or 646 solvent, it will help remove all the fat, also in handy anti-static, the dust are not attracted to the material. Still need to take into account that if the plastic is stained before, not necessarily his prime, it is enough to rub the fine sandpaper. In general, plastics can be divided into two major groups - the stuff that requires pre-priming and therefore is not required. Therefore, experts advise to carefully consider the coating of plastic, if the paint holds up well, then blot it is not necessary. By the way, the soil may be different shades, so try to trim it carefully to the color of paint. The second step in the process of painting plastic car is its filling. Please note that filler for plastics is different from the usual, its feature is the high level of plasticity. That the process of dyeing is not formed in cracks and crevices, after applying the filler, you should use a special abrasive paper. In stores you can find different kinds of paints for the car. A knowledgeable people say that it is very easy to use tools that come in aerosol cans. Very few layers of paint is applied, usually in 3-4.Obyazatelno try to dry the paint after each layer. If used in paint, metallic, one must also apply a coat of varnish, about 20 minutes after the last staining. And finally, the final step is to process the material is colored wax polishing paste, it is good because it makes the surface more smooth, hiding all the errors of the staining of plastic parts. Of course, the room in which the process of working with paint should be light and air, which is important for both human health and for the most staining - the material should not get a lot of dust. And most importantly - be confident in their abilities.
Wednesday, May 22, 2013
NEW 2012 Super Sport Car Bugatti Veyron 16 4 Grand Sport Vitesse – The fastest roadster ever!

The 199 hp increase over the Grand Sport has been mainly achieved by using four larger turbochargers with new intercoolers. Furthermore, Bugatti has extensively reinforced all drivetrain components in order to safely transfer the immense force the Vitesse is capable of. As a consequence of the larger turbochargers and the overall reduced back pressure, it was even possible to reduce the fuel consumption slightly, even with the increased power output.
In order to put the unrivalled power on the road safely and masterfully, the engineers have reconfigured the chassis of the Vitesse. Thanks to the quick-responding dampers that have been adapted from motor racing, the control of the vehicle has been further improved and balanced perfectly. In addition to the incomparable lateral acceleration that is able to go up to 1.4 g, the precise interaction of the tires (on all-new, lighter 20-inch “Vitesse”-type alloy wheels), together with the intelligent all-wheel-drive system, ensures stable handling. Since the reconfigured ESP kicks in slightly later, for example when you accelerate around corners, the Grand Sport Vitesse also provides a more dynamic performance in these types of situations. It goes without saying that Bugatti adapted the brake-cooling system to account for the even higher engine output. The brakes, which are unparalleled in terms of stability and performance, now have additional and larger air intakes.

Bugatti has developed a new roof spoiler for the Grand Sport Vitesse that significantly reduces wind noise and buffering in the interior. Furthermore, there will be a new windbreak for the roadster that can be stored away compactly in the luggage compartment when not in use. Both components will also be available for the Grand Sport. While in place, they allow for an extremely relaxed, open-top driving experience even at speeds around 200 km/h (124 mph).

There is no end to the individualization options for the Bugatti. Each one of the 350 Veyrons built is therefore completely unique. This also applies to the other models that Bugatti is exhibiting at the 2012 Beijing International Motor Show. The Grand Sport Vitesse is painted in all black with red rims in a diamond pattern. Its carmine red interior and seats showcase an aggressive, dynamic look that fits well with the positioning of the new Grand Sport Vitesse. It will cost 1.80 million euros. The classic Grand Sport, a sports car with an elegant, artistic orientation, will, of course, remain in the range. This year in Beijing, Bugatti is presenting a special model to pay homage to the year of the dragon. The one off Grand Sport model “Wei Long 2012″ was developed together with the Königliche Porzellan Manufaktur Berlin and has been fitted with dragon relief sculptures on finest porcelain both on the body and in the cabin endowing the car with deep Chinese cultural heritage. With highly elaborated dragon sculptures on the oil and fuel cap, its white polished exterior and carmine red interior the “Wei Long 2012″ shines with elegance and nobility. The headrests are embroidered with the Chinese “Dragon” character, and the handcrafted 100% silk floor mats are embossed with Chinese “Dragon” character. Highlight is the exquisite center piece with a white porcelain dragon relief sculpture with every detail of a dragon’s body so vividly craved and elaborated. These unique and artistic Chinese features together with the breathtaking speed of the Bugatti Grand Sport of more than 400 km/h make the “Wei Long 2012″ the dragon of the automotive industry. This one off model will cost 1.58 million euros.

Carbon fibre is also the dominant material in the interior (along with stainless metals such as Aluminium and Magnesium) of the Grand Sport Vitesse. Numerous interior parts are now made from carbon fibre in the 1,200 hp roadster. This includes the center console extension, a cover with EB logo in the rear-bulkhead leather trim (between the seat backrests) and the belt outlet covers on the seats. The décor on the center console, the door inserts and the adjoining trim on the instrument panel are also made from carbon fibre. The bi-color black trim parts (for example, in the roof console) are also new in the Grand Sport version, as is a special seat design for the Grand Sport Vitesse.
The new Bugatti Veyron 16.4 Grand Sport Vitesse boasts a remarkable maximum torque of 1,500 Nm (at 3000-5000 rpm) from the 7.9-litre capacity of its W16 engine. The maximum output (1,200 hp) is reached at 6,400 rpm. These figures allow the car to reach 100 km/h (62 mph) from standing in an unbelievable 2.6 seconds. The top speed of 410 km/h (255 mph) makes the four-wheel drive (like all Veyron) Grand Sport Vitesse the fastest production roadster ever.
Monday, May 20, 2013
2011 Honda CR Z Photos Specs And Reviews

Saturday, May 18, 2013
2015 Audi S3 sedan

Its 2.0 TFSI yields 300 HP (221 KW) and develops a torque of 380 Nm. The high-performance four-cylinder incorporates the latest technology efficiency of the house, double injection, an exhaust manifold integrated into the cylinder head, the Audi valvelift system and a rotary distributor module for thermal management.
The Audi S3 sedan equipped with gearbox and six-speed dual-clutch S Tronic sprints from 0 to 100 km / h in 4.9 seconds. To reach 250 km / h speed is electronically limited.
The four-cylinder turbo runs on average 54.9 km / g (14.5 km / l or 6.9 liters per 100 km, equivalent to CO2 emissions of 159 grams per km.
The Quattro drive system incorporates a multi-plate clutch that distributes power between the front and rear axle at high speeds.
The suspension lowers the ride height by 25 mm. After the series of wheels 18 inches hides a brake system of large dimensions, whose front discs having a diameter of 340 mm.
The electrical operating direction progressive transmission ratio varies, more indirect in the central position and very direct steering by force. The driving dynamics system Audi drive select belongs to the standard equipment, while regulation of Audi magnetic ride shock absorbers is available as an option. At first glance, the maximum power model is recognized by changes in the bumper, in the single-frame grille, the air intakes on in the exterior mirror housings, in skirts and rear spoiler.
The diffuser contains four oval end pipes of the exhaust system, incorporating chrome strips. The interior of the Audi S3 sedan is equipped with sports seats (or optional sport seats S), instruments with gray areas and decorative moldings in black 3D design
Thursday, May 16, 2013
Toyota RAV4 next generation Leaked

As these images seem to point, the Japanese firm has produced more than an evolution, an entire transformation for the Toyota RAV4, which in its 2013 version will be closer to the aesthetic of the models are having more success in taking this segment as the Hyundai iX35, he also hopes his own restyling, the Kia Sportage and Nissan Qashqai. An attempt to revive sales of the SUV also relying on elements that are working well in other models like the Toyota Yaris brand.
New look of the Toyota RAV4
Marked change of style in 2013 with this version over its predecessors. The new Toyota RAV4 undergoes a major restyling a car comes out looking much more dynamic and sporty on the path of the line also exploited by the Ford Kuga. A transformation from the point of view of many analysts gives it what was essentially throwing in the midsize SUV. With an aesthetic much more defined and integrated into the dominant style of Toyota models, like the front much reminiscent of the Toyota Yaris, it accentuates the personality of the model.
From the side we see a higher waist, in the ascending line, marked by the nerve that goes to the rear. A more aggressive back in the new Toyota RAV4 because those lights horizontally in an elevated position. A height which also marks the position of the plate holder. A general rise in all the elements that reinforces this dynamic and sporty style which boasts all version 2013.
Dates and forecasts
despite the rumors talk about a possible presentation of the Toyota RAV4 2013 to the end of this year 2012; the truth is that nothing is confirmed yet. Nothing is known of the event or to be chosen for it’s neither coming-out, nor are publicly available official images of the model that we serve to corroborate what we forward this video. Silence from both Toyota on one of your bets stronger in the coming months, a movement seeking to shake the segment of SUVs, dominated in recent times by the proposed East.
Since its original release there by 2006, the Toyota RAV4 will live with this his second major transformation. In 2009 it changed its size and was given a complete view of the design, a design for which has now gone further, adjusting to the fees set by the market today.
Tuesday, May 14, 2013
1970 Dodge Coronet User Manual

The Falsehood Coronet is another success for Land contractor cars. The Coronet obtainable in 2-door coupe, 4-door litter, 4-door send wagon, and 2-door translatable. During 1968 to 1971, a 2-door controlled edition forge Untruth Super Bee was produced supported on the Dodge Coronet.
Sunday, May 12, 2013
Mazda MX 5 GT Concept revealed

Jota Sport is actually responsible for the Mazda MX-5 GT Concept. They took care of Zeal about the technology and appearance, the main modifications to the Roadster. Normally delivers the two-liter four-cylinder 160 hp, the MX-5 GT is 208 hp. The manual gearbox has remained, and the drive to the rear wheels. However, the suspension is thoroughly addressed. Not only does it lower to the ground, nor is it a lot harder for optimum handling. Moreover, the driver according to personal preference. Exactly what may have caused the MX-5 GT will prove during the famous Goodwood hill climb during traditionally held. Makes the car stand out in any case during the action. The orange color is not to be missed in combination with black.
Mazda, the MX-5 GT Concept, accompanied by the MX-5 GT4 racer, back to Goodwood to the reactions of the public to gauge. Depending of the Japanese brand will decide whether their famous roadster in this form into production. As yet it remains a model system.
How to Bleed a Radiator on a 2003 BMW 325i
1. Park your car on level ground and allow its engine to cool for at least three to five hours.
2. Jack the car up and place it on axle stands.
3. Disconnect the negative cable from the battery.
4. Remove the cap from the top of the radiator.
5. Place the drain pan underneath the blue plastic drain plug, found at the bottom of the radiator. Remove the plug with a wrench or spanner.
6. Drain the fluid until it stops. If it contains any debris or metal flakes, you will need a professional to inspect your radiator.
7. Drain the coolant into a bottle, seal it, and dispose of it at an appropriate recycling facility.
8. Inspect the radiator cap for dry rot or wear and tear. Replace it with a new cap if necessary.
9. Flush cold water through the radiator.
10. Fill the radiator with water to help remove the remaining antifreeze.
11. Replace the radiator cap and turn on the engine for five minutes.
12. Turn off the engine and allow it to cool.
13. Repeat steps 3 to 6 until the water is clear.
14. Pour the flushing agent into your radiator. Repeat steps 11 and 12, and then drain the flushing agent.
15. Replace the plug once all of the coolant is emptied out of the radiator. Tighten to 2 to 3 Nm (18 to 27 inch pounds).
16. Remove the small plastic bleed screw to the right of the radiator cap. Using a large funnel in the expansion tank, slowly fill the car with new liquid--50 percent coolant, 50 percent distilled water. Restart the car engine for five minutes to open the thermostat.
17. Add more antifreeze or coolant until the radiator is full. Screw the cap back on the radiator.
18. Bleed the air out of the expansion tank on the side of the radiator. Otherwise you will have a separate, external expansion tank which is self-bleeding. With the bleed screw removed, fill the expansion tank until fluid begins coming out of the bleed screw.
19. Run the engine until it reaches its operating temperature. Turn off the engine and let it cool down. Top up the coolant in the expansion tank to the appropriate level, if necessary.
How Do I Fold Down the Rear Seats on a 2003 CLK 320
1. Start the CLK 320s engine. Press the back headrest button located on the center dashboard console. Fold the rear headrests back by pressing the release button located on the sides of the headrests while pushing forward on the cushions.
2. Open the trunk. Locate the red release handle for the rear backrest. Turn the release handle counterclockwise.
3. Pull the release handles located on the exterior sides of the bottom seat cushions. Fold the bottom seat cushion forward.
4. Grasp the top of the rear seats backrest. Fold it forward to complete the process.
19861989 mercedes benz 560sl
How to Reset the Service Indicator on a 2002 BMW X5
1. Insert the key into the ignition. Leave the key in the Off position.
2. Press the odometer button. Hold the button down. Turn the key to the Acc position.
3. Release the odometer button after reset appears on the display.
4. Press and hold the odometer button until reset flashes in the display. Release the button.
5. Press and release the odometer button. END SIA appears in the display for two seconds, indicating the reset was successful.
How to Replace a 2001 Audi A4 Tail Light
1. Turn off the A4. Ensure that the parking brake is on and that the gear selector is in Park.
2. Open the trunk by either pulling on the trunk release button beneath the steering wheel or by pressing the trunk release button on your key fob if you have that option.
3. Locate the oval panel on the side of the trunk wall. Pry the panel off with a flathead screwdriver, using gentle pressure to avoid cracking the plastic of the trunk. There will be a bolt head inside the cavity that was covered by the plastic panel.
4. Loosen the bolt inside the cavity. This will release the lens cover on the brake light on the rear of your Audi. Be prepared to catch the lens, to prevent scratching the lens or the rear paint. If the lens cover does not come off on its own, you can pry it off gently with a flathead screwdriver. Be gentle to avoid damaging the paint or cracking the lens.
5. Remove the light bulb from the electrical harness by hand. The bulb just plugs into the port--no special tools are necessary. Place the lens cover back on the tail light. While holding the lens up, thread the bolt back into the cavity by hand until it catches in the grooves on the lens backing. Tighten the lens down with a wrench, until the lens cover will no longer wiggle if you push on it.
6. Repeat this process for the other tail light. Turn the car back on and test the brake lights by pressing down on the brakes while someone else looks for the brake lights to signal.
2014 VIPER SRT TA limited to only 33 units

Available from the third quarter, the 2014 VIPER SRT TA "Time Attack" is limited to only 33 units, all of which take as exterior paint color "Orange Crusher". Its price is $ 120,500, which makes it more expensive than the standard Viper ($ 102,500), but cheaper than the Viper GTS ($ 125,000).
It features a 8.4-liter V10 engine with 640 horsepower (477 kW) and 814 Nm (600 lb-ft) of torque, but what differentiates this variant is tuned suspension Bilstein, DampTronic developed system for use in the track.
While the standard model has structural aluminum X-Brace, the benefits of 2014 VIPER SRT “Time Attack" is that it comes with a carbon fiber brace lighter.
He has also received greater Brembo brake kit and Sidewinder II wheels with Pirelli P Zero Corsa. The new package brings aerodynamic front splitter, rear spoiler and a rear implement. Instead of the logos, the 2014 VIPER SRT TA "Time Attack" have stickers indicating that it has taken some of the weight. Speaking of weight, SRT mention tips the scales at 1518 kg car. As a reminder, the Viper weighs 1521 kg basis, while GTS variant amounts to 1,530 kg.
The interior remains the same, with the exception of the new seam as Orange Crusher on the seats, center console, and instrument panel, pull the brake, console, shift manager and boot, doors and steering wheel.
Saturday, May 11, 2013
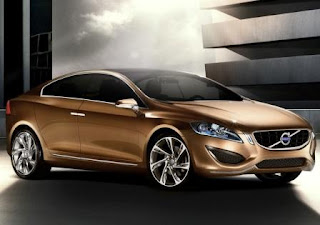
Volvo S60 is the safest car in the luxury segment
The Audi A4, BMW 3, Mercedes C and Lexus 250 are less secure than generally assumed. This is shown by tests from the Insurance Institute for Highway Safety (IIHS). Which, according to this U.S. security organization much more realistic than the Euro NCAP tests, in Europe as the standard apply.
Until the end of the nineties could a carmaker - at will - each new model praise as the "safest" car. Convincing evidence came mostly only of Mercedes and Volvo, both of which have done pioneering work in the field of safety in and outside the car. With the establishment of Euro NCAP in 1997 came to an end happy that unhealthy situation.
Euro CAP enjoys confidence of European government,
manufacturers and consumers
Structure of Euro NCAP was to assess the safety performance of the best selling cars in Europe to investigate and scores to be awarded in the form of stars, by analogy with the Michelin Guide. In addition, several situations examined, ranging from a frontal and side impact pole test about the protection of children in the car and Pedestrian Street, whiplash, seat belt reminders and speed limiters. For each of the tests were very detailed procedures and standards developed. How to find the frontal collision at a speed of 64 km / h against an immovable block with a sheet of aluminum. The collision is under Euro NCAP representative of the most common accidents with serious or fatal injury. The crash test simulates a head-on collision of two cars with similar weight to 55 km / h. The difference in speed is the result of the energy that is absorbed by the deformable plate. Each test is by high speed cameras filmed the images are compared with the measured values and provide additional information on the impact of the collision on the so-called dummy in the car.
Based on the results of the various tests, Euro NCAP has the new car review ranging from one to five stars. A new model achieves a maximum score, and then sends the car manufacturer usually once a press release from the good news. Rated a new model bad, then its likely that the manufacturer of the launch or even adjust. The measurement results from Euro NCAP will be much echo in the media, reducing the risk of reputation damage is high. And that risk to or dare not walk the brands.
Since 1997, dozens of models discussed. Euro NCAP has proven to be a professional and independent organization that enjoys the confidence of both the European Commission and the car industry and the national motoring and consumer organizations. Euro NCAP is an important player in the field of road safety, the safety organization puts the sector to new developments and rewards those efforts with a good score. Euro NCAP has undoubtedly saved many lives, both in the car on the street. Thus, the increased attention to the protection of children and pedestrians manufacturers undertook drastic changes to the concept and design of their new models.
Since 2010 has Euro NCAP Advanced awards also allow for advanced safety technologies. So this year were the autonomous emergency braking system from Audi (Pre Sense Front Plus), Mercedes (Collision Prevention Assist) and VW (City Emergency Brake) and the system for a better view (Adaptive Forward Lighting) Opel a special mention.
Doubt representative character of crash test
the recently published test of the Insurance Institute for Highway Safety (IIHS) has caused a stir in Europe. According to the U.S. safety institute concentrates the Euro NCAP crash test on frontal collisions and collisions along the side. In reality, this type of collision is not common, said IIHS President Adrian Lund. "Almost all new cars score well in frontal collisions, yet we note more than 10,000 deaths each year in collisions."
The so-called small overlap frontal crash "of the IIHS, the car is 64 km / h against a heavy block catapulted, with only 25 percent of the front of the car the obstacle. The test simulates a collision in which the vehicle at the corner being hit by a tree or another car. The results of these tests show that the Audi A4, BMW 3, Mercedes C and Lexus IS 250 moderate to insufficient score. This immediately led to reactions from Audi. This should show that the German manufacturers criticism of U.S. security organization seriously and will take action. What action that actually entails, as we have provision ally’s guess.
The fact is that the results of the IIHS test to ensure nervousness in the car world and that a heated discussion is to come about which the most realistic tests. European manufacturers are not amused: in what situations they must now focus on the design of new models? Euro NCAP pulls the short end, and then the European brands their safety philosophy of mind and maybe even adjusts. This does not apply to Volvo, the Swedish security pioneer in Chinese hands. According to the IIHS, the Volvo S60 is the safest car in the luxury segment. Data is a confirmation of the excellent score that the car previously obtained by the Euro NCAP test and a pat on the continued efforts in the area of road safety. For once brings the good news headlines.
2013 Fiat 500e

Fiat 500e. The Italian firm extends the range of the Cinquecento to launch in Los Angeles Auto Show electric version of the compact Italian.
The Fiat 500e seeks to add to market electric vehicles new features, combining Italian design with great performance and autonomy, and a technology applied to batteries that guarantees performance in any kind of weather.
The power plant based on an electric battery capable of developing 83 kW (111 HP) and be recharged in less than four hours. It also offers a range of 116 mpg in city and 100 mpg on the road.
 |
| Interior |
To accommodate the EV drive Fiat technicians designed a new chassis and suspension modified to improve grip and braking ability. As for his body, which was sculpted in the wind tunnel, he made eight changes that improved their autonomy down force giving extra 5 miles.
Inside are a design that combines vintage and futuristic features which in turn related systems incorporating electric propulsion. The board found a seven-inch screen with information about the vehicle and a TomTom satellite navigation system. Excels combining tones present in the cockpit, which combines black and white with electric orange.
Excels special application for smartphone that allows the vehicle owner to access the 500e load levels, knowing the energy use and locate the nearest charging stations.
The launch of the 2013 Fiat 500e is scheduled for the second quarter of next year.
C7 Corvette turbo with 1 000 horsepower promised from Hennessey
C7 Corvette turbo with 1,000 horsepower promised from Hennessey
.jpg) |
| C7 Corvette turbo with 1,000 horsepower promised from Hennessey |
.jpg) |
| C7 Corvette turbo with 1,000 horsepower promised from Hennessey |
.jpg) |
| C7 Corvette turbo with 1,000 horsepower promised from Hennessey |
.jpg) |
| C7 Corvette turbo with 1,000 horsepower promised from Hennessey |
.jpg) |
| C7 Corvette turbo with 1,000 horsepower promised from Hennessey rear view |
.jpg) |
| C7 Corvette turbo with 1,000 horsepower promised from Hennessey |
 |
C7 Corvette turbo with 1,000 horsepower promised from Hennessey |
 |
| C7 Corvette turbo with 1,000 horsepower promised from Hennessey badge |
C7 Corvette turbo with 1,000 horsepower promised from Hennessey
How to Program the Bluetooth in a 2003 BMW
1. Start your BMW and activate the Bluetooth on your cell phone. When the car is turned on, it is in pairing mode and will look for a cell phone.
2. Select Bluetooth on your phones Bluetooth connections menu. This option may be called Connections and varies with the type of phone you own. Select the option that lets your phone search for Bluetooth devices. Consult your phones owners manual for specific instructions on how to complete this step.
3. Wait for your phone to locate your BMW. When it finds your BMW, you will see BMW followed by five numbers, which are the last five digits of your BMWs VIN number. Select the confirmation option when your phone asks you if you want it to sync with the vehicle.
4. Enter the Passkey number when your phone prompts you. You can find the passkey inside the booklet that includes your owners manual. The passkey is four digits and will be listed after PK, the abbreviation for passkey. You have about 20 seconds to enter the passkey on your phone before the sync process ends. If the sync is successful, you will see Loading Phonebook flashing on your radios display screen. Your phonebooks contacts will load to your radio where you can access them. It could take a few minutes for your contacts to transfer.
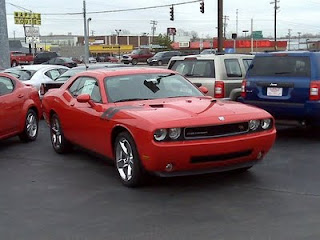
KW Dodge Challenger Renovation with Quality and Style Blend of American Muscle Cars
 |
| KW Dodge Challenger - Creative Renovation of Muscle Car |
One of the legends in the American muscle car the Dodge Challenger, came back to liven up a classic car collection which gradually began to decrease. Appearance aesthetically shaped muscle on the front radiator grille, large cubic capacity engine, KW dental specialists who enhance the performance of the Dodge at the time of passing the bend. High quality components make the Challenger KW different from other cars and maintain the identity of American-style car.
 |
| KW Dodge Challenger Engine Components |
 |
| Rear Angle View of KW Dodge Challenger |
 |
| KW Dodge Challenger HRE Wheel Dunlop SP Sport |
As a diversified sports car also made it sound sporty style with an engine mounted air filter K & N and a new exhaust system from Magnaflow uses 18-inch pipe, two-pipe system will roar and then a 3.5-inch exhaust pipe end section.
 |
| Door Style of KW Dodge Challenger |
 |
| Interior of KW Dodge Challenger |
quoted from: babez.de/2009/07/kw-dodge-challenger / #
Fiat 500 by Gucci【Video】
Gucci and Fiat unveiled the 500 by Gucci, the special-edition model is available in a black and white exterior color with Gucci scheme green-red-green stripes. The vehicle will debut at the Geneva Motor Show.
The stripes also appears inside on the seats, on the gear shift, the key-cover, the carpets and on the seatbelts. The interior also features chic embroidery, exclusive materials, glossy and satin chromes, the velvety varnish on the “radioboard,” the two-toned seats in Frau leather with the Guccissima print.
Based on the 100bhp 1.4-litre petrol powered model, outside, the car comes with 195/45 R16 wheels, with rear brake calipers in Gucci green.
While Fiat marked the collaboration with the car, Gucci has come out with a a range of clothing and accessories to mark the occasion, including bags, hats, scarves, sunglasses and even a wristwatch. Both were launched at Milan Fashion Week, and will be displayed at a dedicated stand at the Geneva Motor Show next week.


Press Release
Fiat and Gucci announce the "500 by Gucci": a new italian design icon is born
In the year that sees the celebration of both the 150th anniversary of the unification of Italy and Guccis 90th anniversary, Gucci and Fiat are proud to unveil the 500 by Gucci, a special edition of the iconic Fiat 500 customized by Gucci Creative Director Frida Giannini in partnership with Fiats Centro Stile. This unique collaboration between two of Italys most respected brands represents the perfect - combination of craftsmanship and style. Launched on the opening day of Milan Fashion Week, the 500 by Gucci will also be on presented at the Geneva International Auto Show from March 3rd to13th, in a dedicated Gucci pop-up store within the Fiat stand.
Frida Giannini said, "In the 50s the Fiat 500 created a style revolution when it first hit the road. It quickly become the must-have car of its time. Travelling in style has also been at the heart of Gucci ever since Guccio Gucci founded his company as a producer of leather trunks, suitcases and handbags in 1921. So, when Lapo Elkann suggested the idea of this collaboration it struck me as a perfect opportunity to create a new modern travel statement in this Guccis 90th anniversary year".
The black and white colours of the 500 by Gucci, in unique eye-catching glossy pearl glass paint, set the stage for a neo-classic black and white film. These two distinct colors complement one another: black, with detailing in shiny chrome paired with interiors that contrast sharp black and white, for a contemporary and racy attitude. White, with satin chrome detailing and ivory and black interiors for a softer, sophisticated look.
The exterior is further personalized by rims for 195/45 R16 wheels, including the unmistakable retro design of the rays, harmonizing with the surrounding exterior colors and representing a novelty for this category of car. The hubcaps feature the interlocking GG in the same color of the body of the car and the cursive Gucci signature appears on the hatchback as well on the doorpost. The version equipped with 1.4 of 100 horsepower comes with rear break callipers in Gucci green. The cars silhouette is outlined by Guccis signature green-red-green stripe, which runs along the entire perimeter and links the exterior to the interior. The stripe also appears inside on the seats, on the gear shift, the key-cover, the carpets, and in an innovative finish on the seatbelts. The interior space of the 500 by Gucci is stylish yet functional down to every last detail: chic embroidery, exclusive materials, glossy and satin chromes, the velvety varnish on the "radioboard," the two-toned seats in Frau leather with the Guccissima print.
The communications activity behind the worldwide launch of the 500 by Gucci is being developed with the support of Lapo Elkann and his agency, Independent Ideas, and will include a fully integrated above and below-the-line campaign. Commenting on the collaboration, Lapo Elkann said: «I am honored that I was able to connect Fiat and Gucci, especially in such an important anniversary year for Italy. Being Italian, it makes me proud to have contributed to this 500 by Gucci, which brings together the spirit of two brands that so perfectly symbolize our countrys savoir faire in the world. It has indeed been very gratifying to work again on the car I love most with Fiats Centro Stile and with Frida Giannini».
The 500 by Gucci will initially be available from April 1st to June 30th exclusively by pre-order online at www.500bygucci.com, with a list price in Italy that starts from 17,000 euro all inclusive. The car will also be displayed in exclusive locations in metropolitan cities such as Paris, London and Tokyo, followed by the European commercial launch in July. It will then become available in the rest of the world at the end of the year.
Completing the customization is the exclusive 500 by Gucci collection, including travel accessories, small leather goods, drivers, tracksuits, bombers, driver gloves, sunglasses and a watch, which will be available in select Gucci stores and online at www.gucci.com from April 2011.
Mercedes SLS AMG Matte Editions Launched in Japan

Mercedes has unveiled the new SLS AMG Matte Editions - the replacement for the current SLS AMG for Japan.
The SLS AMG Matt Black Edition – only available as a roadster – comes with a designo Magno Night black exterior finish with a black soft top and red accents on the three-pointed star, grill fins, fin bonnet, fender fins, AMG Rear Emblem, 6.3 emblem and fuel lid. The interior has a two-tone color specification with Red/Black colors and the dashboard and door panels dressed in Nappa leather.
The Matte White special edition boasts the same setup, except the red accents found on the Matte Black edition are black on the Matte White edition. A clean white pinstripe highlights the black tires and the interior is elegantly done in a black and white motif. Further, carbon-ceramic brakes are available on both models as an option, but no particular modifications on engine were performed on either of the models.
The SLS AMG Coupe Matt in white costs 29 million Yen (US$366,400 / €293,500), while its Roadster sibling, 30 million Yen (US$379,000 / €303,500).


Press Release
Limited release the SLS AMG Matt Edition
limited number of special specification car mat paint body color (matte painting)
- contrast exterior paint shine by special metal parts
Mercedes-Benz Japan Co., Ltd. (President: Nicholas Speaks, Head Office: Minato-ku, Tokyo), the super sports car "SLS AMG (coupe / roadster)" of the model dedicated to the AMG Mercedes matte painting of the setting and special (paintwork) will be released only through the authorized Mercedes-Benz dealer network across the country today that uses the metal parts of the special paint, the "SLS AMG Matt Edition".
This special edition car, announced in September last year, was well received your "SLS AMG Matt Black Edition (coupe)", "SLS AMG Matt Black Edition (roadster)" which continues to "SLS AMG Matt White Edition and we offer three models (coupe / roadster). "
"SLS AMG Matt Black Edition (roadster)" is, designo Magno Night black metal parts (three-pointed star, grill fins, fin bonnet, fender fins, AMG Rear Emblem, "6.3" emblem, fuel lid on the exterior of (Black Matte) Red was to paint), and then produce a unique and powerful exterior. The interior will be two-tone color specification sheet Furureza Classic Red / Black, with a sense of unity with the exterior Motaseru, texture enhanced by using the dashboard and door panels in nappa leather material also.
"SLS AMG Matt White Edition (coupe / roadster)" is, designo adopted (will be added door mirror covers the contents above) metal parts that are special paint in matte black on the exterior (white matte) Magno Cashmere White, The interior specification will be Furureza of porcelain / Black. In addition, these special equipment are assembled at the AMG Performance Studio as a model for Japan only.
AMG RIDE CONTROL sports suspension enhancing comfort and maneuverability electronically controlled damping force of the damper depending on driving conditions on all models, AMG performance steering (/ Alcantara ® leather), matte black paint AMG 10 spoke aluminum wheels (Matt Black Edition is the rim section is equipped with a red paint).
How to Replace BMW Performance Brakes
Taking the Old Brakes Off
1. Empty the brake fluid from the vehicle. The fluid is corrosive and can cause serious problems if it starts to leak unexpectedly.
2. Use a breaker bar to loosen the wheel bolts on the first wheel. Do notremove them yet.
3. Jack up the front of the vehicle, using jack stands to help support the axle and frame
4. Loosen the rotor-retaining screw on either side of the BMW. Do not remove them yet.
5. Remove the retaining clip with a flat-head screwdriver and set it aside.
6. Remove the protective caps over the caliper guide bolts and then remove the bolts themselves. Set them all aside nearby.
7. Remove the caliper, using a c-clamp to depress the piston. (Calipers in good condition shouldnt present any problems, but older ones may be difficult because the rotors are worn.) Push the piston back into the caliper when you are done.
8. Loosen the 16mm bolts while holding the caliper carrier to the steering knuckle, then remove the carrier from the knuckle. Clean the carrier with brake cleaner if it is dirty.
9. Using a dead-blow hammer, strike the rotor once at the 3 oclock position, once at the 9 oclock position, once at the 6 oclock position and once at the 12 oclock position, in that order. It should come loose and allow you to remove it. Dont use anything but a dead-blow hammer, or you may damage the rotor.
10. Use brake cleaner and a cleaning pad to get rid of the old anti-seize compound on the hub. Then apply new anti-seize to the hub. The coating should be very thin; make sure you get the threads of the bolt holes as well, as the face of the hub.
Putting the New Brakes On
11. Take the new rotor by the center (not the edges) and thread it onto the hub. You may wish to clean any preservative oils off the rotor and add some anti-seize before you do this, but it isnt necessary. Make sure its tight: the torque specs should be 12 ft*lbs.
12. Clean the carrier bracket in an appropriate wash basin, then spray it with brake cleaner and allow it to dry.
13. Reattach the caliper carrier bracket. The bolts need to be torqued to 81 ft*lbs.
14. Add a bit of grease to the lubrication points of the brake pads, and then insert them into the carrier. Its usually best to insert the outer pad first.
15. Reinstall the caliper. The retracted piston should allow it to fit into place without a problem.
16. Clean the caliper guide pins with brake cleaner and then reinsert them into their positions.
17. Reattach the guide bolt caps and the retaining clip.
18. Repeat the entire process with the other three wheels.
19. Place new brake fluid in the BMW and then lower the car off the jacks.
Friday, May 10, 2013
How to Change the Brakes on a 320CLK
Remove Worn Brakes
1. Loosen the bolts or lung nuts on the Mercedes 320 CLK wheels with a socket.
2. Raise the Mercedes 320 CLK coupe with a hydraulic pump or floor jack. Support the coupe with jack stands.
3. Remove the wheel and tire off the Mercedes.
4. Remove the old brake pads and retaining pins using a socket and ratchet.
5. Clean the brake caliper where the brakes usually sit. Inspect the brake caliper and dust cap for damage. Replace parts that have leaks or imperfections.
6. Inspect the disc brakes for deterioration.
7. Review the master cylinder reservoir to check the level of brake fluid. Siphon the fluid until the reservoir is at half capacity.
8. Use a c-clamp to apply pressure on the brake caliper.
Install New Brakes
9. Place the dust cap, if it appears worn. Resurface or replace the rotor, if its damaged. Replace the rubber seal near the guide if worn.
10. Put the new brake pads, retaining springs and retaining pins on the brake caliper.
11. Refill the brake fluid levels in the master cylinder reservoir.
12. Pump the brake pedals several times to accurately set the brake pads.
13. Put the wheels and tires back on the 320 CLK.
14. Lower the Mercedes 320 CLK back to the ground. Ensure the brake pedal feels firm before driving the car.
Dodge Charger

The Dodge Charger is an American automobile manufactured by the Dodge division of Chrysler. There have been several different Dodge vehicles, on three different platforms, bearing the Charger nameplate. The name is generally associated with a performance model in the Dodge range; however, it has also adorned a hatchback, a sedan, and a personal luxury coupe.
The three main iterations of the Dodge Charger produced were a mid-sized (B-body) car from 1966 to 1978, a subcompact (L-body) car from 1983 to 1987 and the (LX and LY) full-sized sedan built since 2006.

The name Charger was also used in Brazil as sport car based on the Dart, between 1970 and 1980.

Charger models
1964 Dodge Charger (1964 concept): a roadster-style show car based on the Dodge Polara
1965 Dodge Charger 273: a limited production option package for the Dart GT
1966–1978 Dodge Charger (B-body): a rear wheel drive coupe and muscle car
1970–1980 Dodge Charger: Brazilian version based on the Dodge Dart,with a higher-compression 318 V8 engine
1983–1987 Dodge Charger (L-body): a front wheel drive subcompact hatchback
1999 Dodge Charger (1999 concept): a rear wheel drive concept car
2006–present Dodge Charger (LX): a rear wheel drive sports sedan.

With the failure of the 1969 Dodge Charger 500, the 1969 Dodge Charger Daytona was a high performance, limited edition version of the Dodge Charger produced in the summer of 1969 for the sole purpose of winning NASCAR races. And win it did: it won its first race out, the inaugural Talladega 500 in the fall, and helped Bobby Isaac capture the 1970 Grand National championship, although he didnt win any races in the Daytona in 1970. Buddy Baker in the #88 Chrysler Engineering Dodge Charger Daytona was the first driver in NASCAR history to break the 200 mph mark on March 24. 1970 at Talladega.

The Dodge Charger was reintroduced for 2006 with a limited production Dodge Charger Daytona package that included a sportier interior, classic high impact exterior colors, a rear spoiler, a front chin spoiler, a blacked out grille surround, rear quarter panel striping reading "DAYTONA" on either side, a blackout decal between the taillights on the decklid, and a blackout on the hood with the word "HEMI" cut out twice. Heritage R/T badges replaced the Stock R/Ts chrome badges. A performance suspension with load-leveling rear shocks was also standard, as well as unique wheels.

In 1968, Dodge watched their NASCAR inspired Charger R/T fail to beat the Ford cars on the high-banks oval-tracks. The Dodge engineers went back to the wind tunnel and found the tunneled rear window caused lift and the gaping mouth induced drag. Dodge engineers made the rear window flush with the rest of the roof and put a 1968 Coronet Grille up front. The original Charger 500 prototype was a 1968 Charger R/T with a 426 Hemi. The prototype was painted in B5 Blue with a white stripe.